Creating and editing a study in BioConnect
The Study Curation section of BioConnect allows users to describe an investigation and related studies, assays, and data files. Ontologies and controlled terms are used to annotate these research objects, supporting a consistent search and enabling understanding and reproducibility of research data.
Not all users have access to the Admin and Curation sections of BioConnect. If you would like to add your study data,
please email us at bioconnect_support@jax.org or find us on the #bioconnect-support Slack channel. Please see the Controlling Access page for details on permissions.
1. Log in
Log in to BioConnect using JAX SSO (https://bioconnect.jax.org/). The home page will be displayed as shown in Figure 1 below:
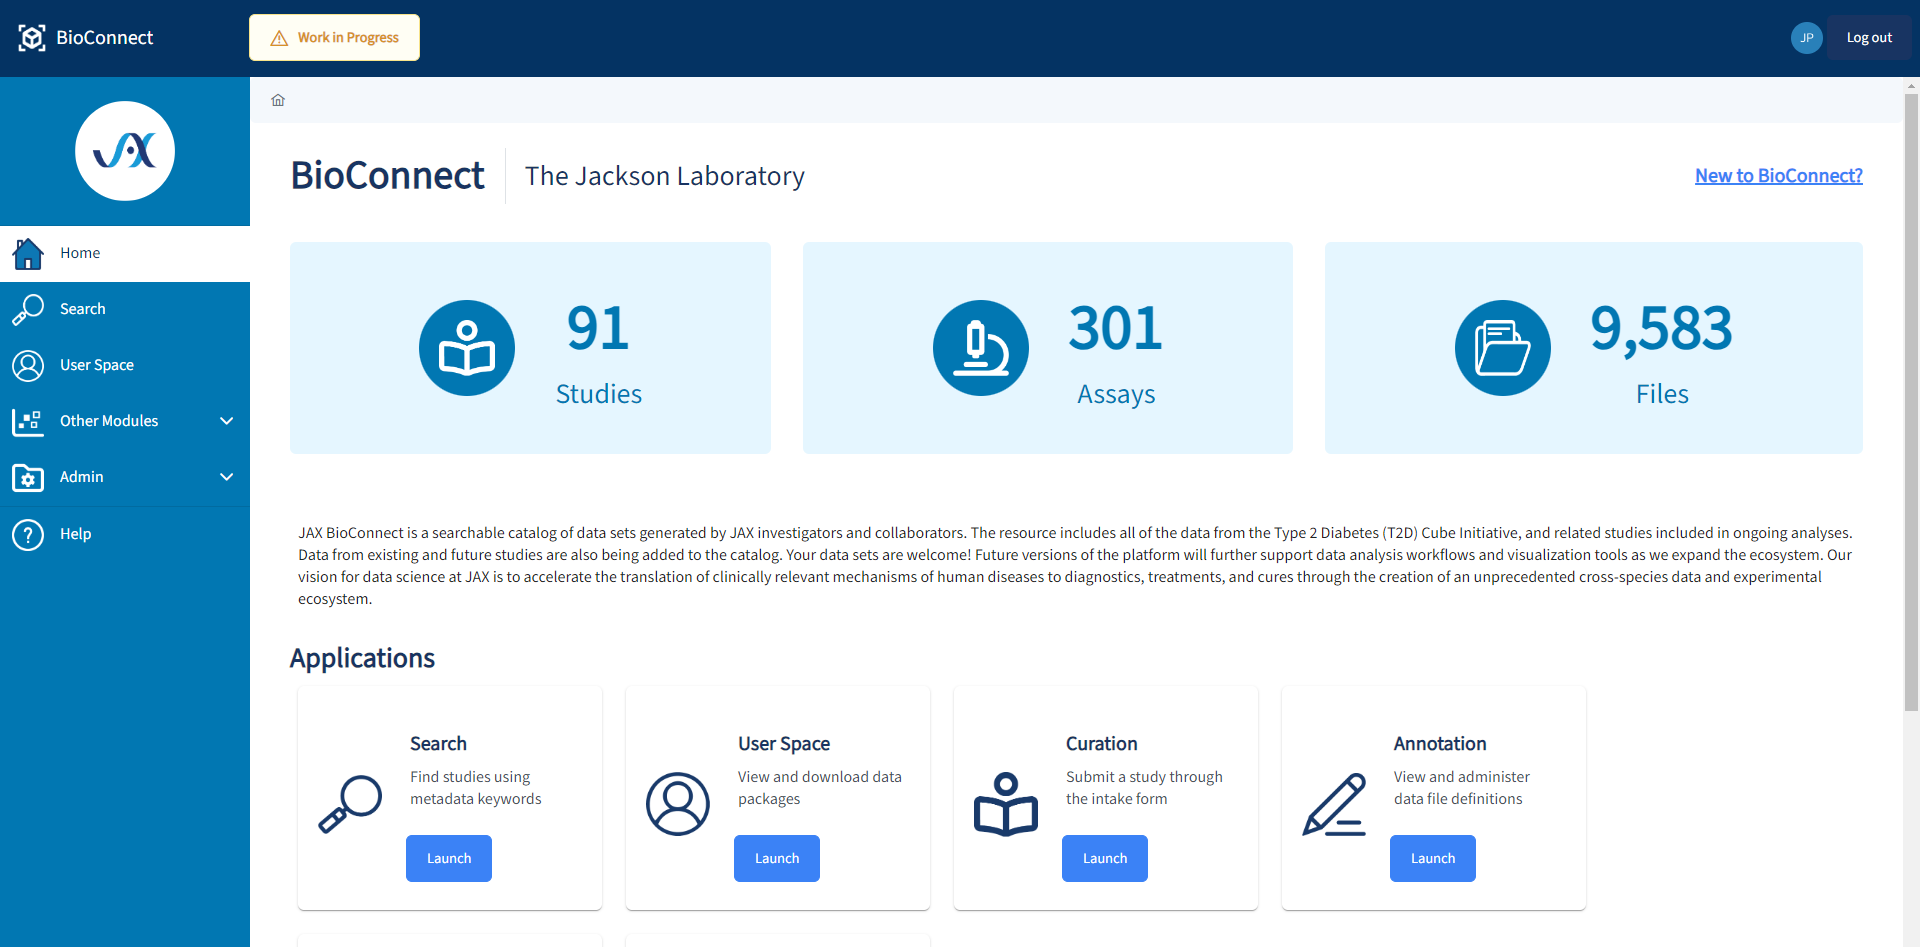
Figure 1: BioConnect homepage.
2. Launch the curation dashboard
Launch the Curation dashboard or under Admin tab, select Curation. If the Curation tab is not visible, email us at bioconnect_support@jax.org or find us on the #bioconnect-support Slack channel. You need to be added as curator or uploader in order to access Admin tab.
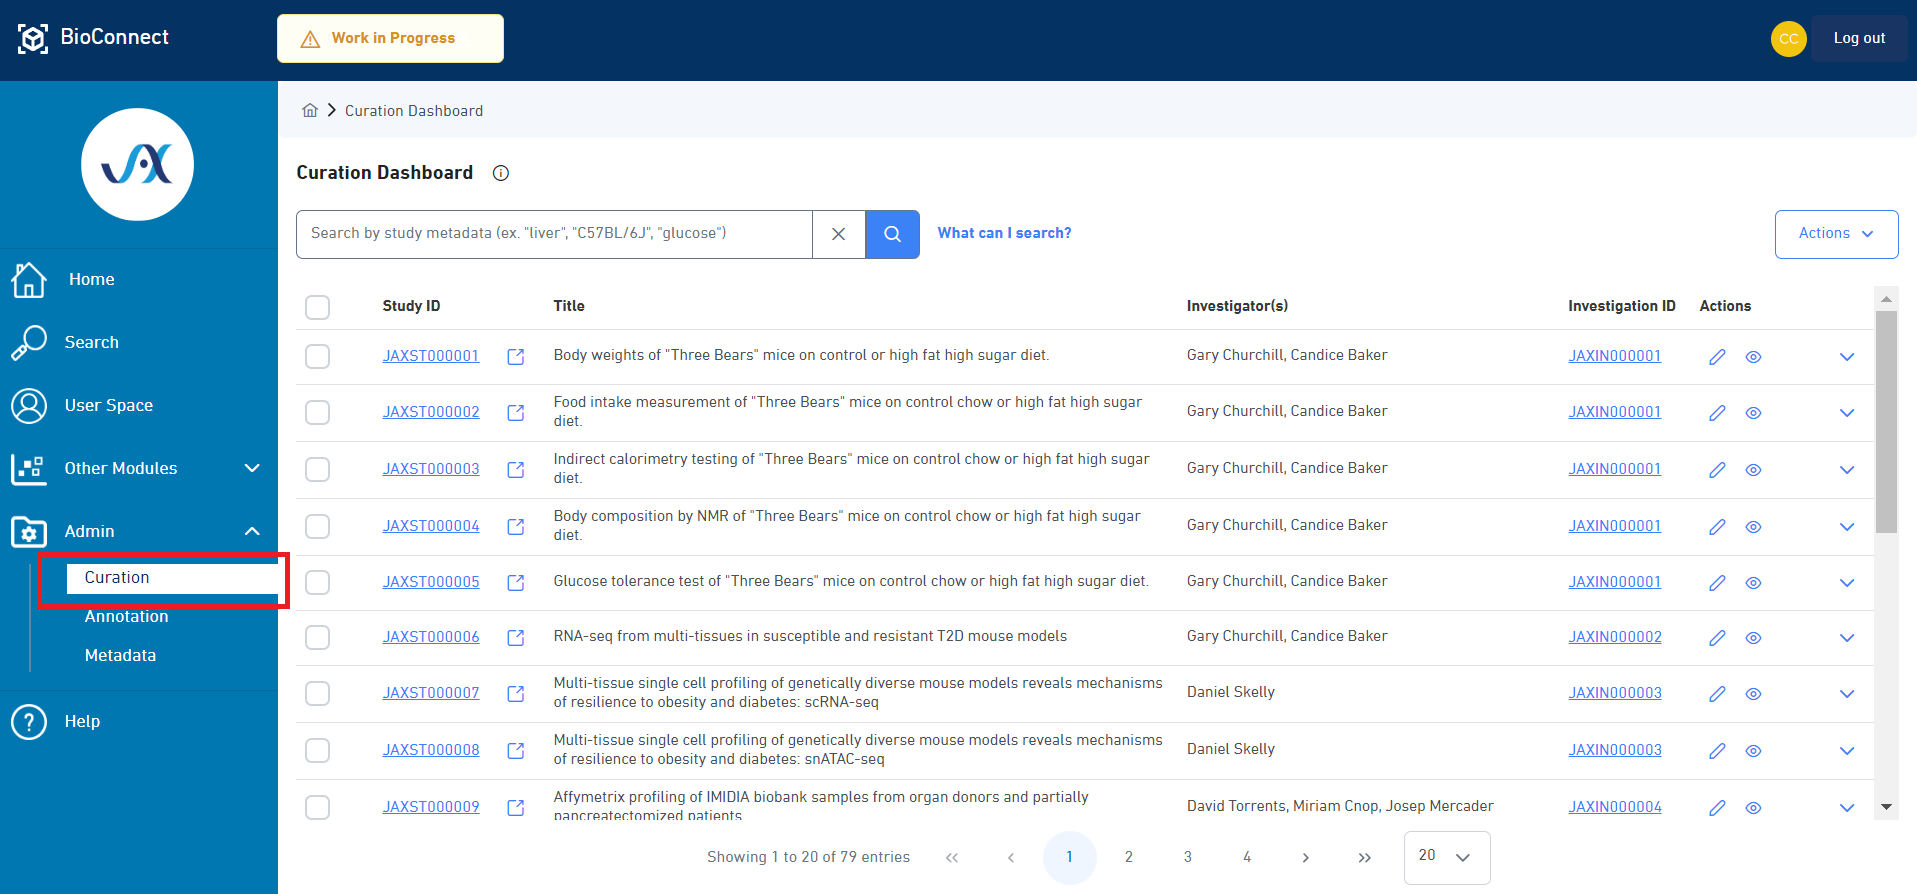
Figure 2: Access study curation. You may also navigate to curation from the applications shortcut on the homepage.
3. Create a study
To create a new study, open the + Actions menu in to top right of the Curation Dashboard, and select + Add New Study as shown in Figure 3.
If you are editing a pre-existing study, select the pencil icon for the desired study under Actions on the right hand-side of the page as shown in Figure 3.
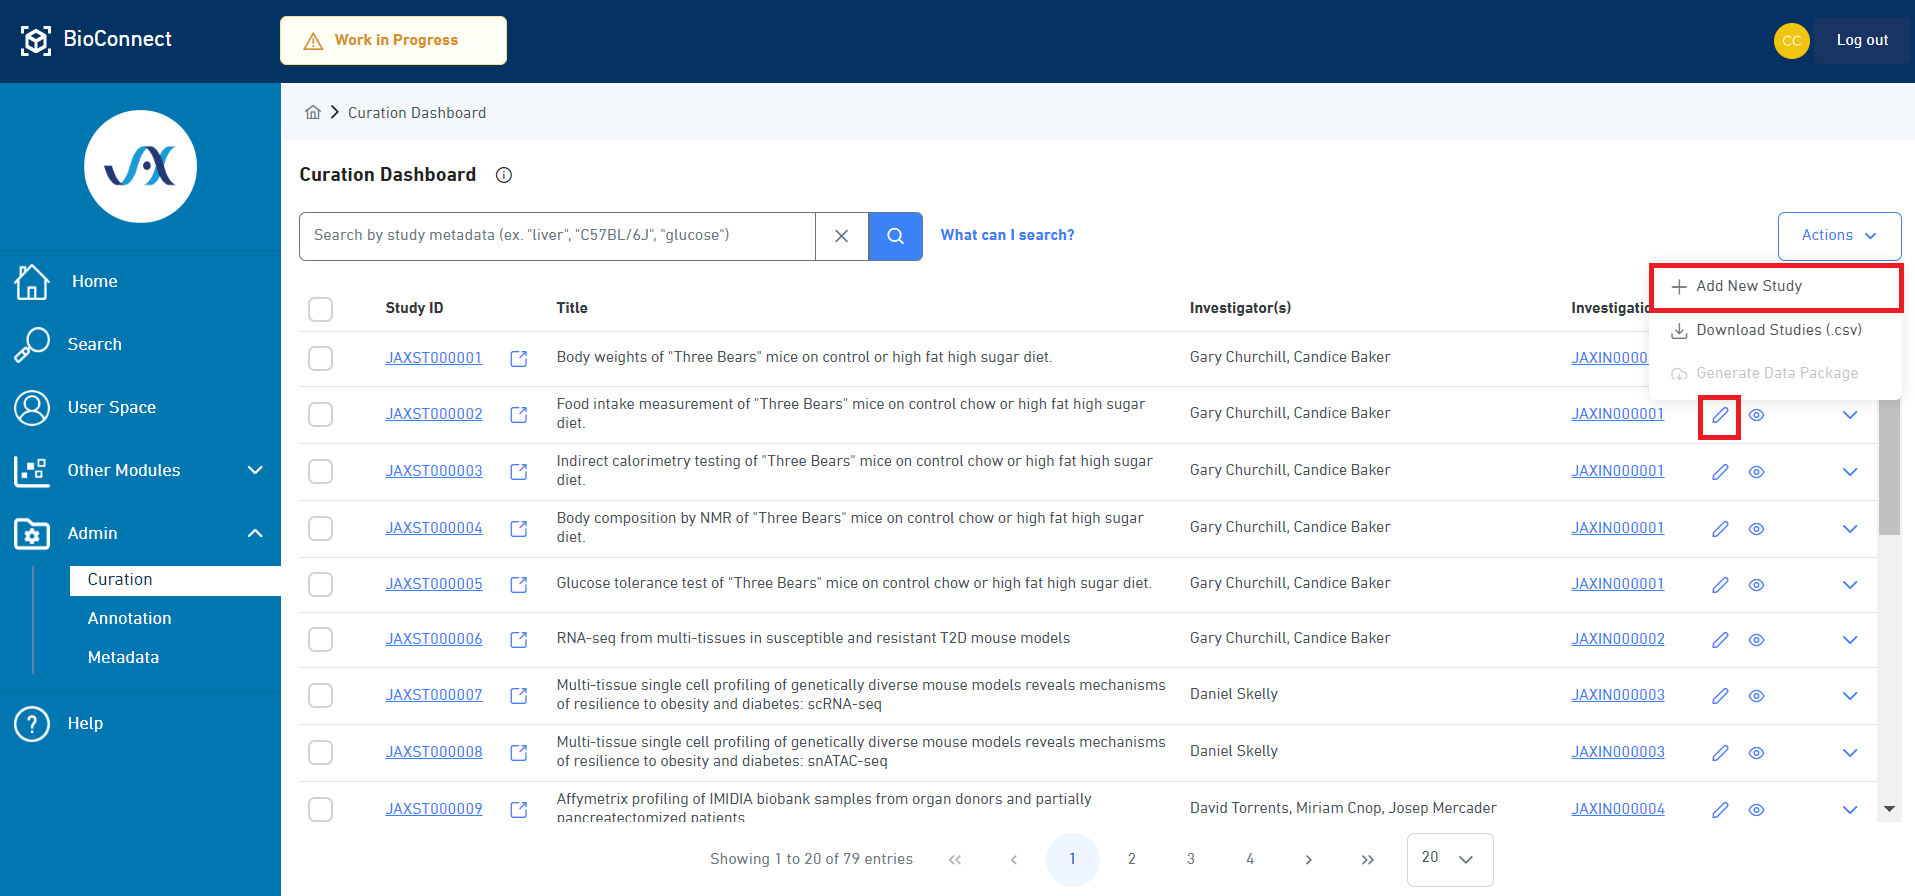
Figure 3: Create a new study or edit an existing study.
4. Add study details
Add a title and description to your new study. The study ID is automatically assigned. The study title is the only required field.
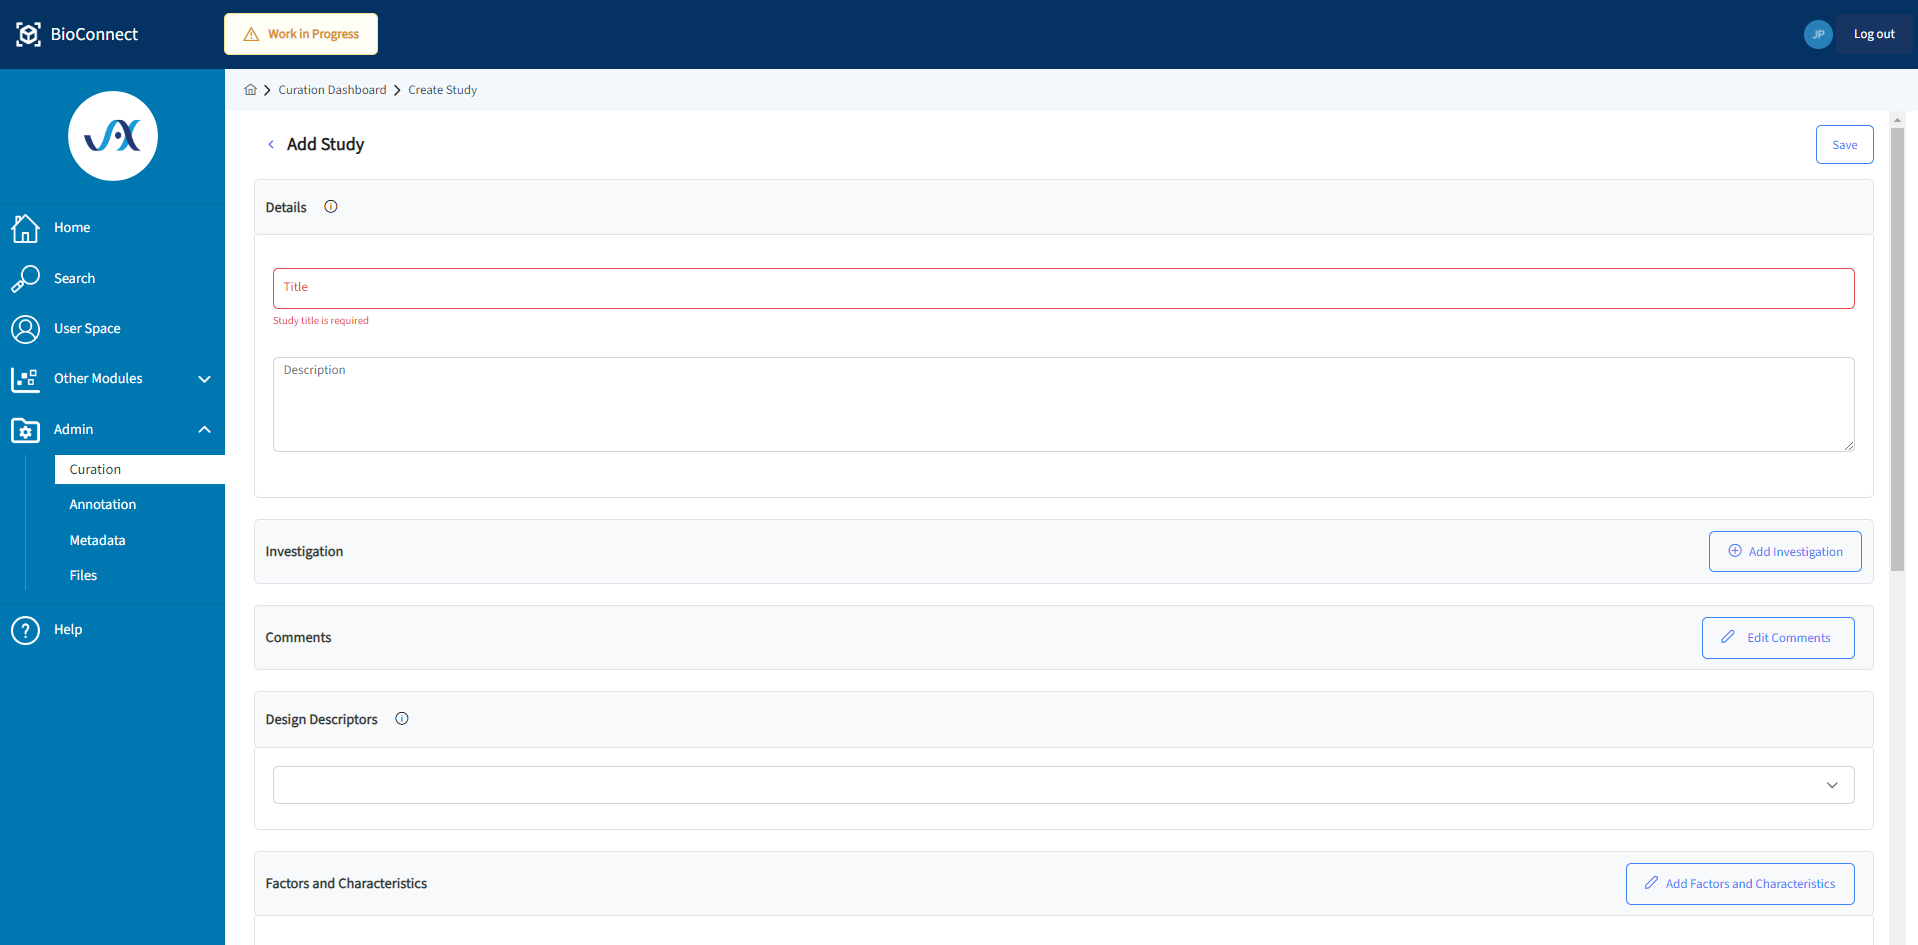
Figure 4: Add study title and description before adding other data. It is recommended to save the study as you enter your data to prevent accidental data loss.
5. Add an investigation
Add an investigation to a study with the + Add Investigation button below the study description. This will bring up a dialog with a list of existing investigations as shown in Figure 5. Multiple studies may belong to one investigation.
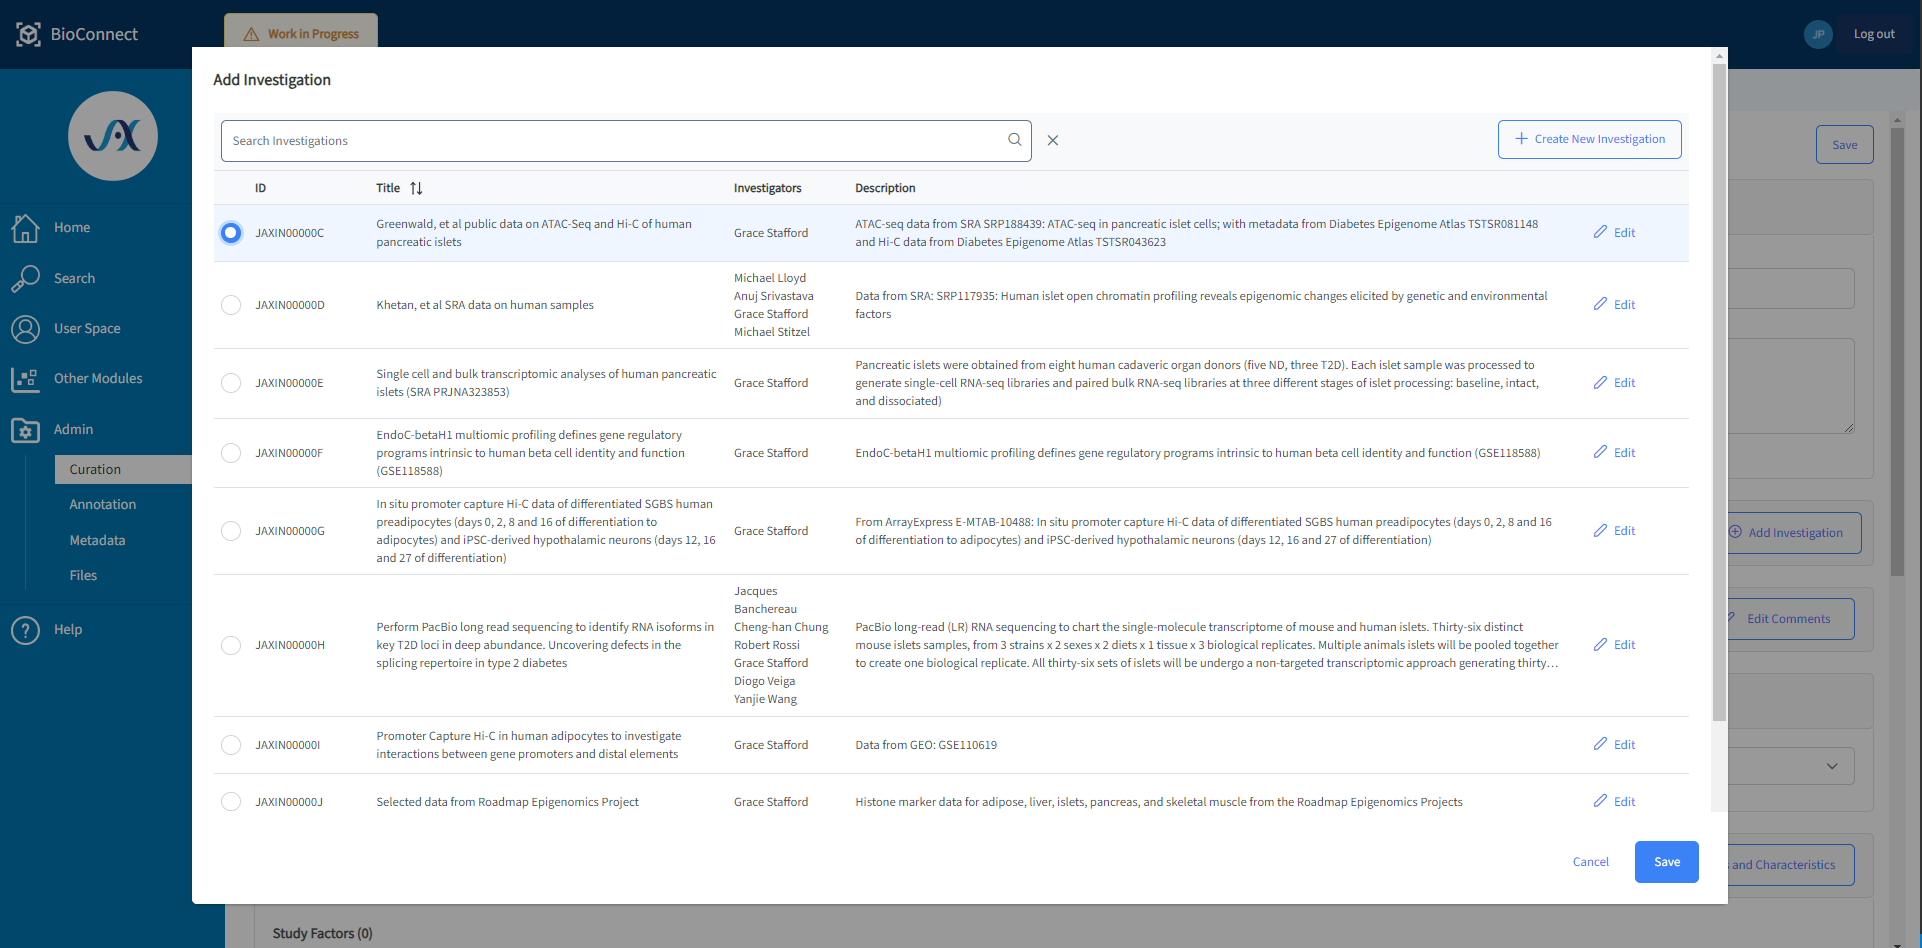
Figure 5: Select an investigation from an existing list.
If you are creating a new Investigation, select the + Create New Investigation button within the dialog. Add a title, Description, and Contacts. If the appropriate contact doesn't appear on the list, select + Create New Contact in the upper right corner of the contact section and fill in the necessary details as shown in Figure 6.
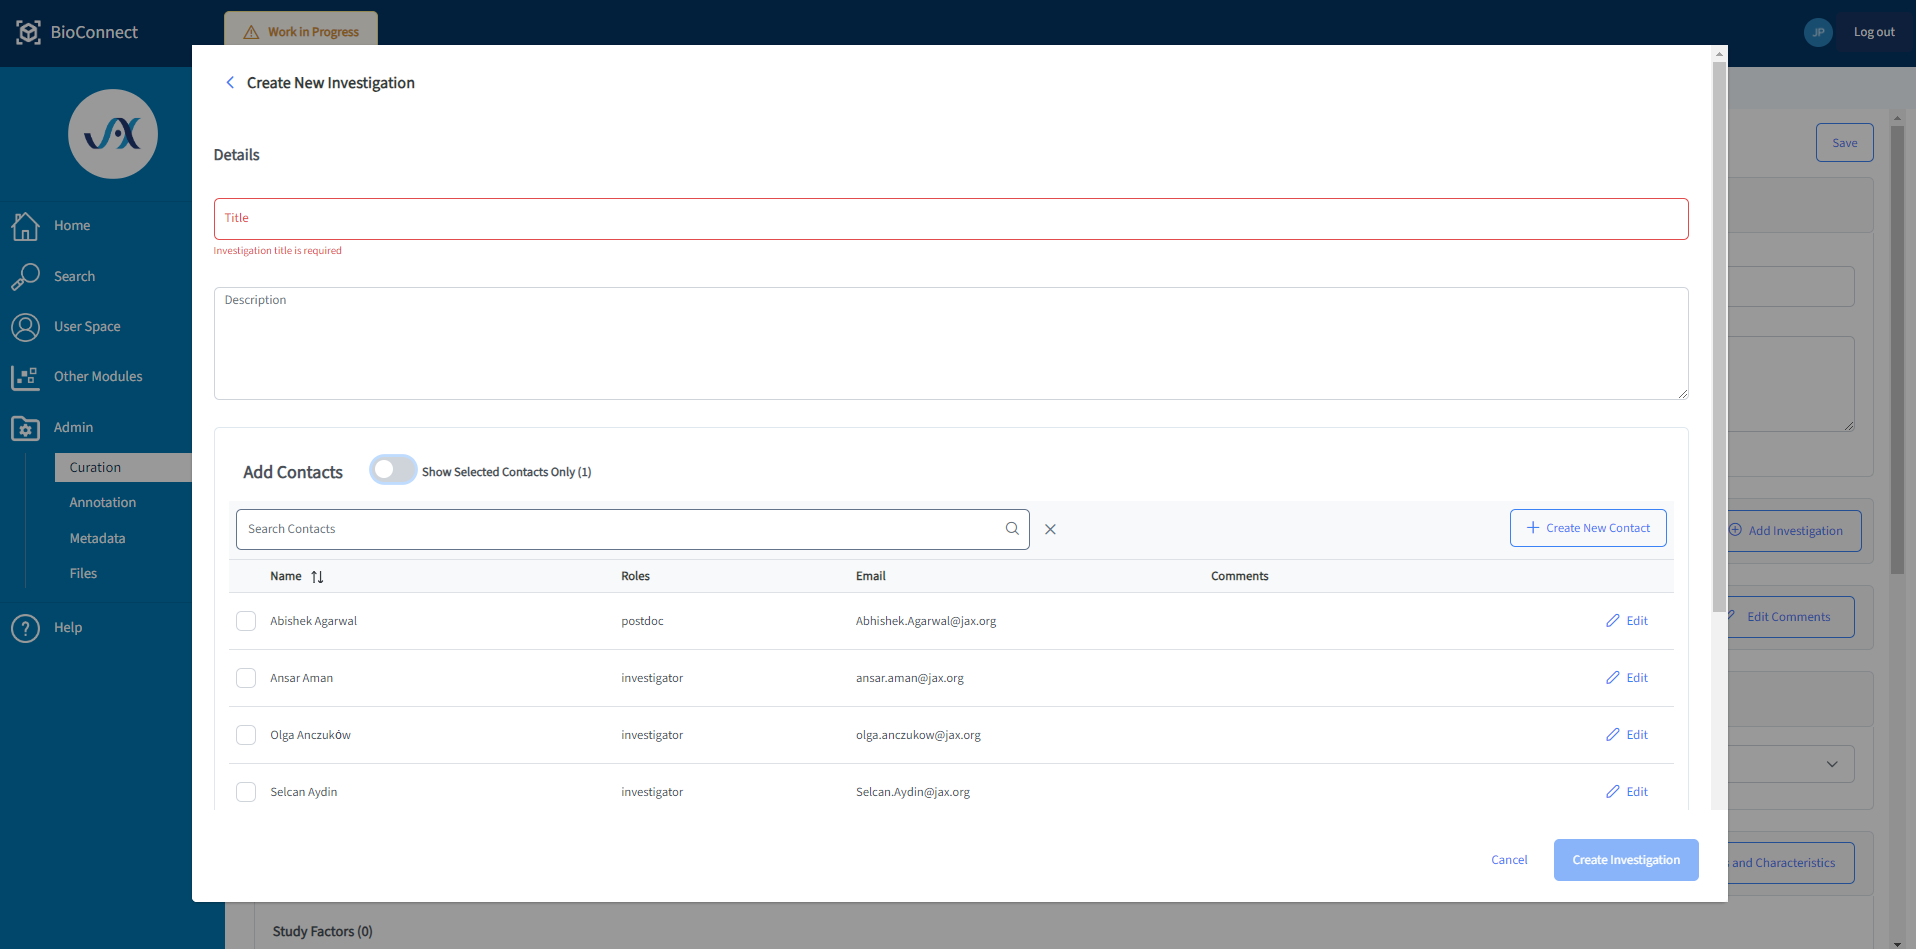
Figure 6: Create a new investigation using the button on the top right of the list.
6. Design Descriptors
Add one or more terms describing the study design (e.g., longitudinal, factorial, time series). These are controlled terms. If you do not see an option that fits your study design email us at bioconnect_support@jax.org or find us on the #bioconnect-support Slack channel and we can add one for you.
7. Factors and Characteristics
Manage the factors and characteristic categories for your study using the Add Factors and Characteristics button. Using the dropdown, populate all terms you wish to use for factors and characteristics and assign them using the appropriate checkboxes.
Factors are another name for the independent variables of a study. These use controlled vocabulary terms and can be chosen from the dropdown list. Select one or more study factors that relate to the study design. The list of available factors is managed by BioConnect curators in the Metadata > Administer controlled terms section. Contact the BioConnect team if you need to add new factor terms.
Characteristic Categories describe the biological sources or samples. Select one or more categories that define the characteristics collected for study sources (i.e. test subjects). For example, if you will be recording the strain of the mice in the study, select strain as a characteristic category. All source categories will be included in the sources grid below. All sample categories will apply to all assay sample grids within this study.
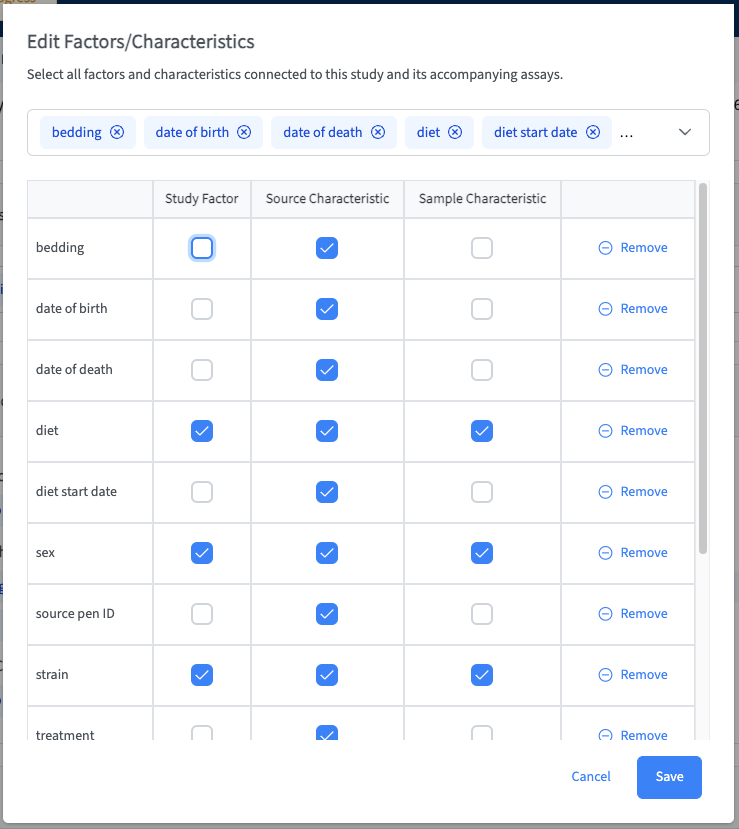
Figure 7: Add your study Factors and Characteristic Categories. A factor corresponds is an independent variable manipulated by the experimentalist. Source and sample characteristics are attributes associated with an organism or sample, respectively.
8. Add protocols
Select all protocols used in the study from the grid by clicking the plus icon. Protocols are an administered controlled term, contact BioConnect curators if you want additional protocols to be added to the existing list. Protocols may be stored outside BioConnect since they may not be published, yet.
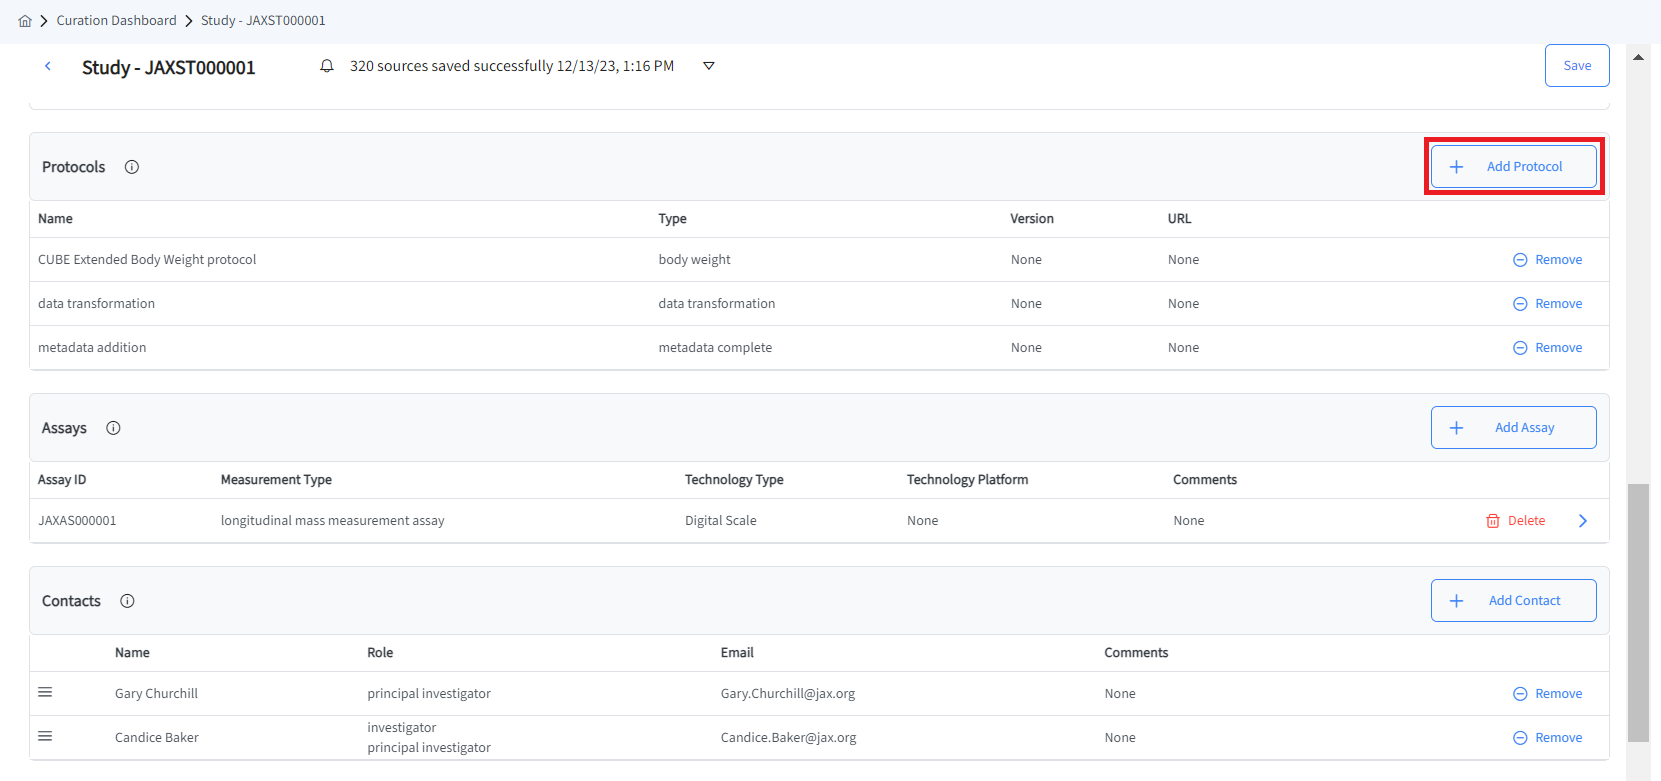
Figure 7: Add your study Protocols to reference in all associated assays.
Assays
Assay information next in the curation form, but skip this for now. Assays shouldn’t be added until you have added sources and the study has been saved.
9. Contacts
Add any individual who will be contributing to the study. Each contact has a role within the study. As with investigation contacts, you can add a new contact by clicking the + Create New Contact button in the top right of the contact window as shown in Figure 8
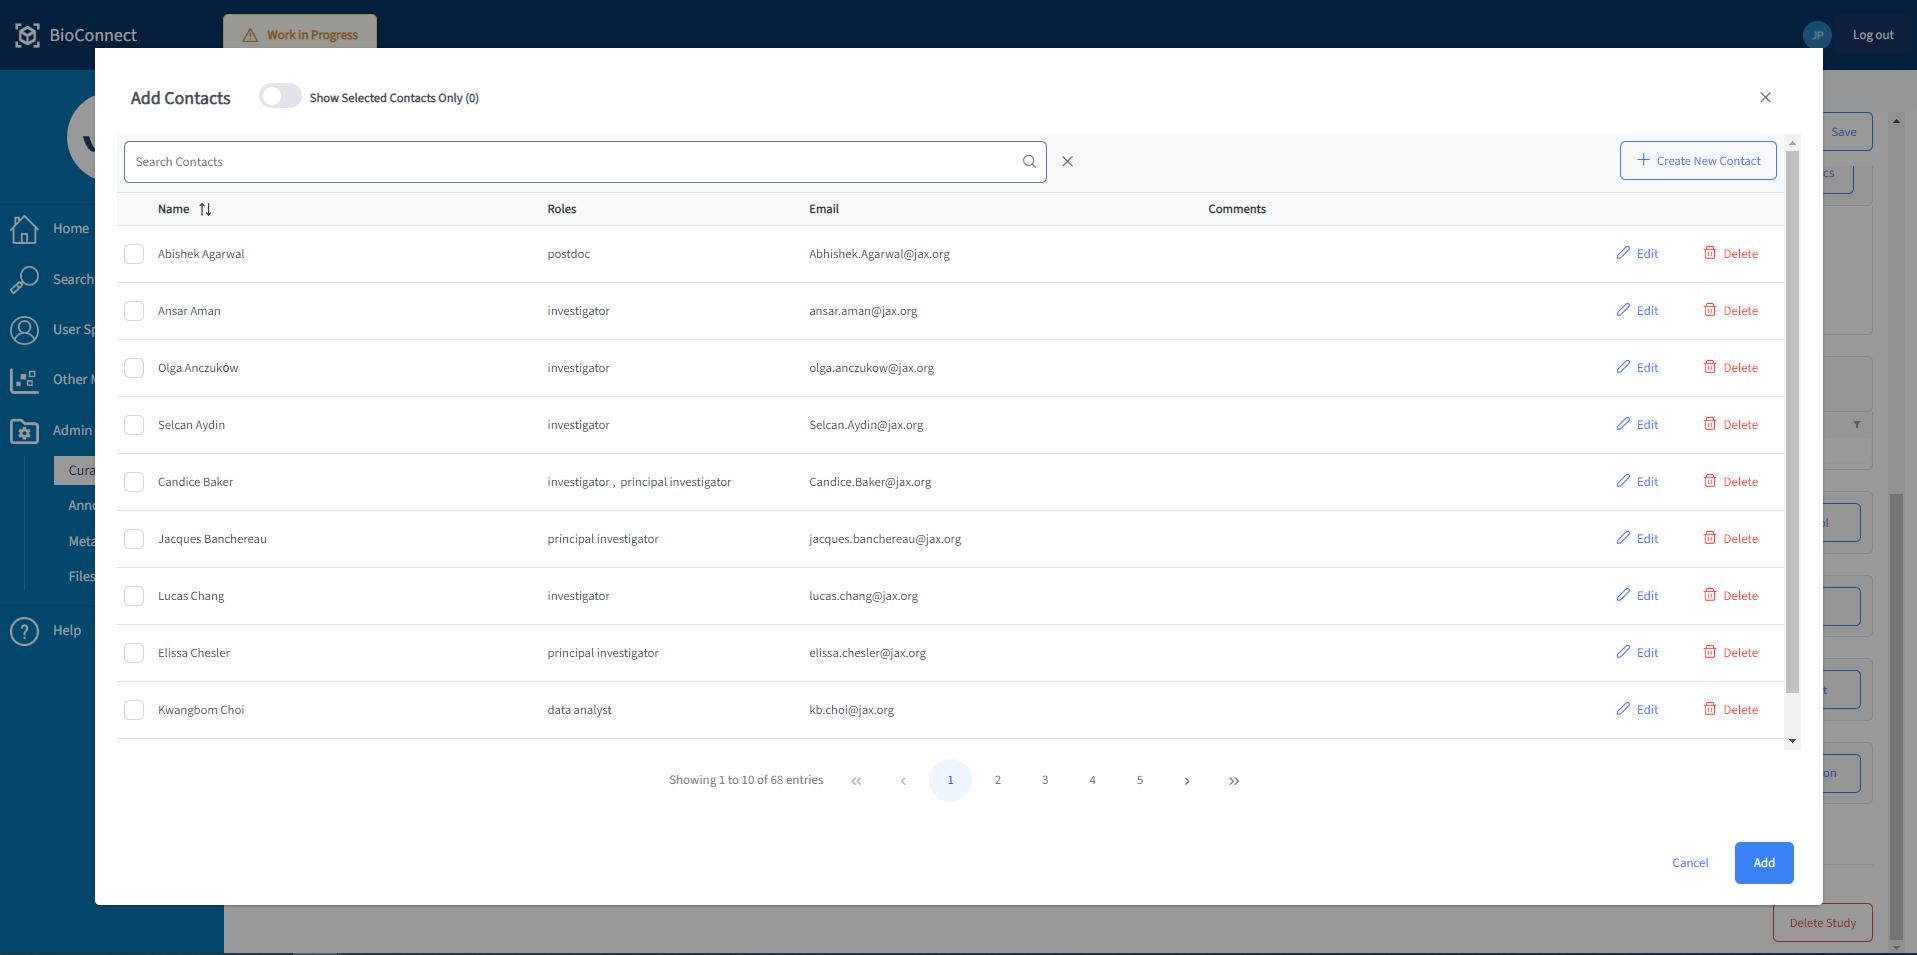
Figure 8: Add your study contacts.
10. Add publications
Add any publications associated with the study. Click the + Create New Publication button to add a publication. You will be able to add existing publications to the study from Publication table or enter new ones if they don't already exist. You can add one or multiple publications to your study.
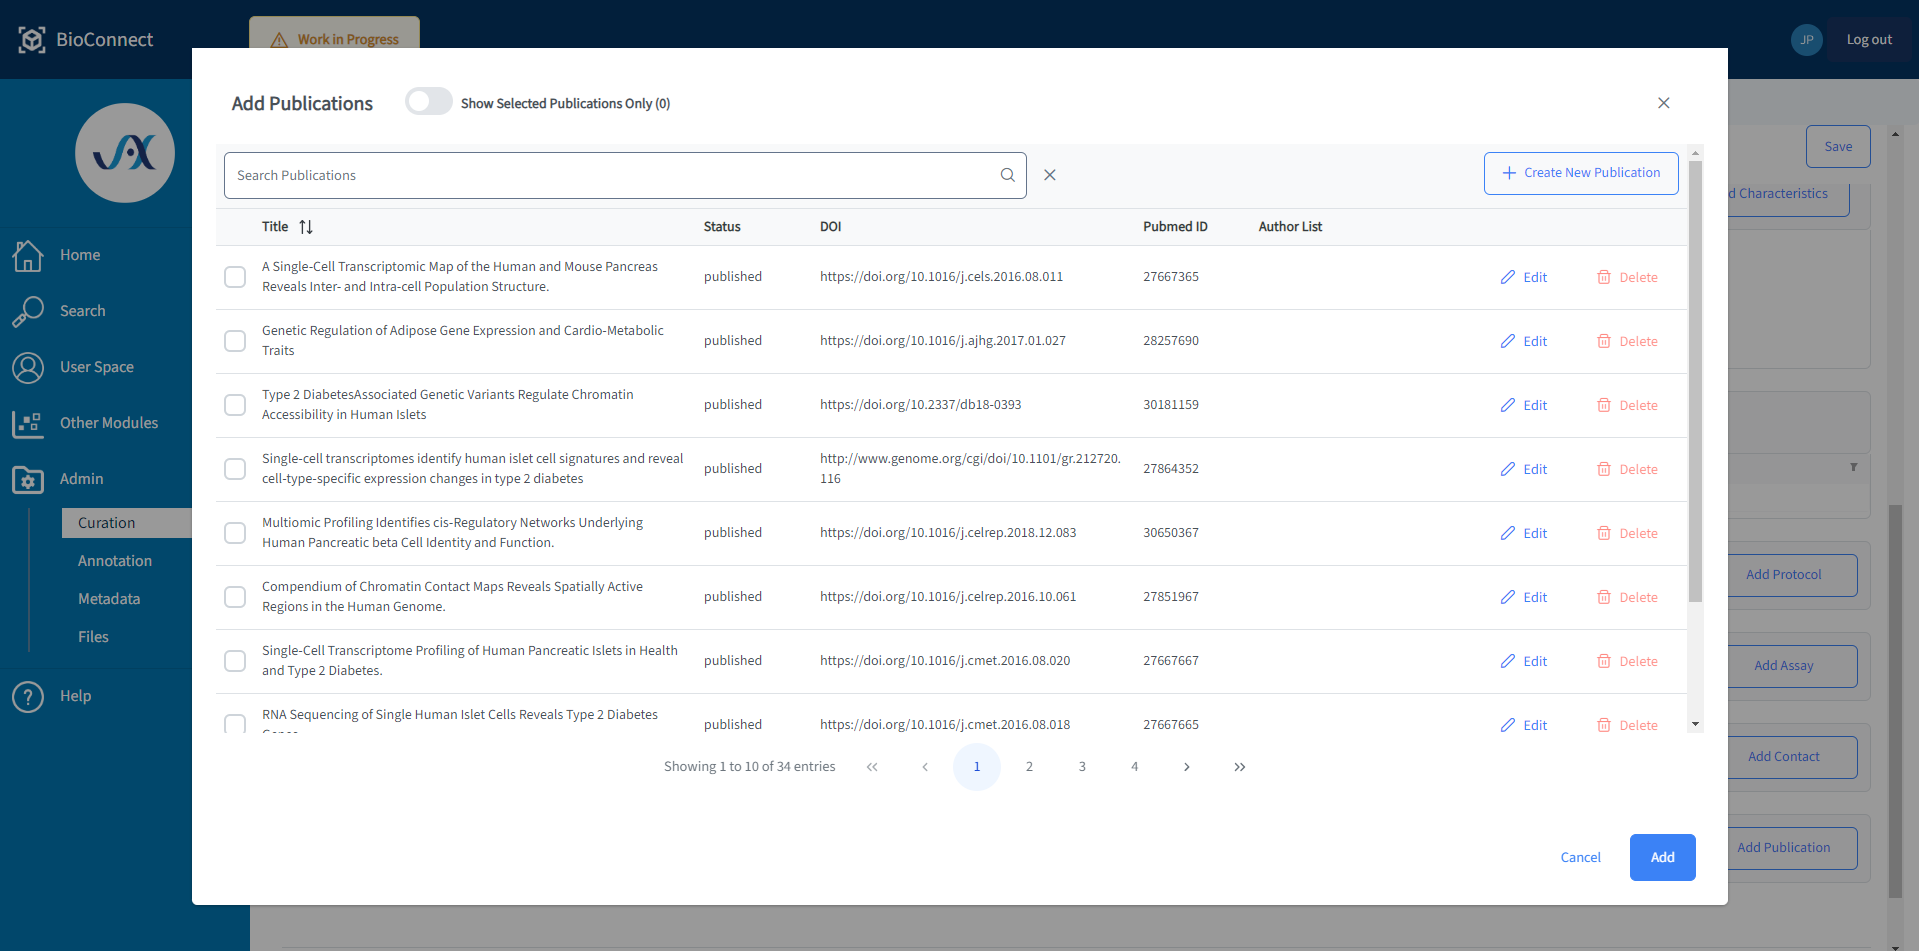
Figure 9: Select existing publications using the check-boxes, or add new publications by clicking + Create New Publication.
11. Add source metadata
The columns generated in the sources table will match up with your characteristic categories. You can copy and paste your metadata from Excel into the source table. The cell you are copy/pasting into must be blue for the copy/paste to work correctly. See Figure 10 below. If there is a flashing cursor in the cell, your clipboard contents will all paste into that one cell. Make sure to click the empty row underneath before saving. You can drag the columns to reorder them to match up with your own spreadsheets to facilitate easier copy/pasting. Factor values are added to samples and are not added to the source table.
To edit source metadata you can type directly into a cell, add a new row at the bottom of the list, or delete a row. To delete an entire row, click in the empty space adjacent to the row number and hit the delete key on your keyboard.
Note: Once you save the study, the columns in source’s grid will be displayed in alphabetical order.The columns can also be filtered, sorted, and resized much like in Excel.

Figure 10: After adding source characteristic categories, ensure that you have first selected the cell in the left column (highlighted in blue) and then paste your metadata values.
12. Comments
You may include multiple distinct comments to the study as short notes or keywords. Examples include grant information and identifiers for grant aims.
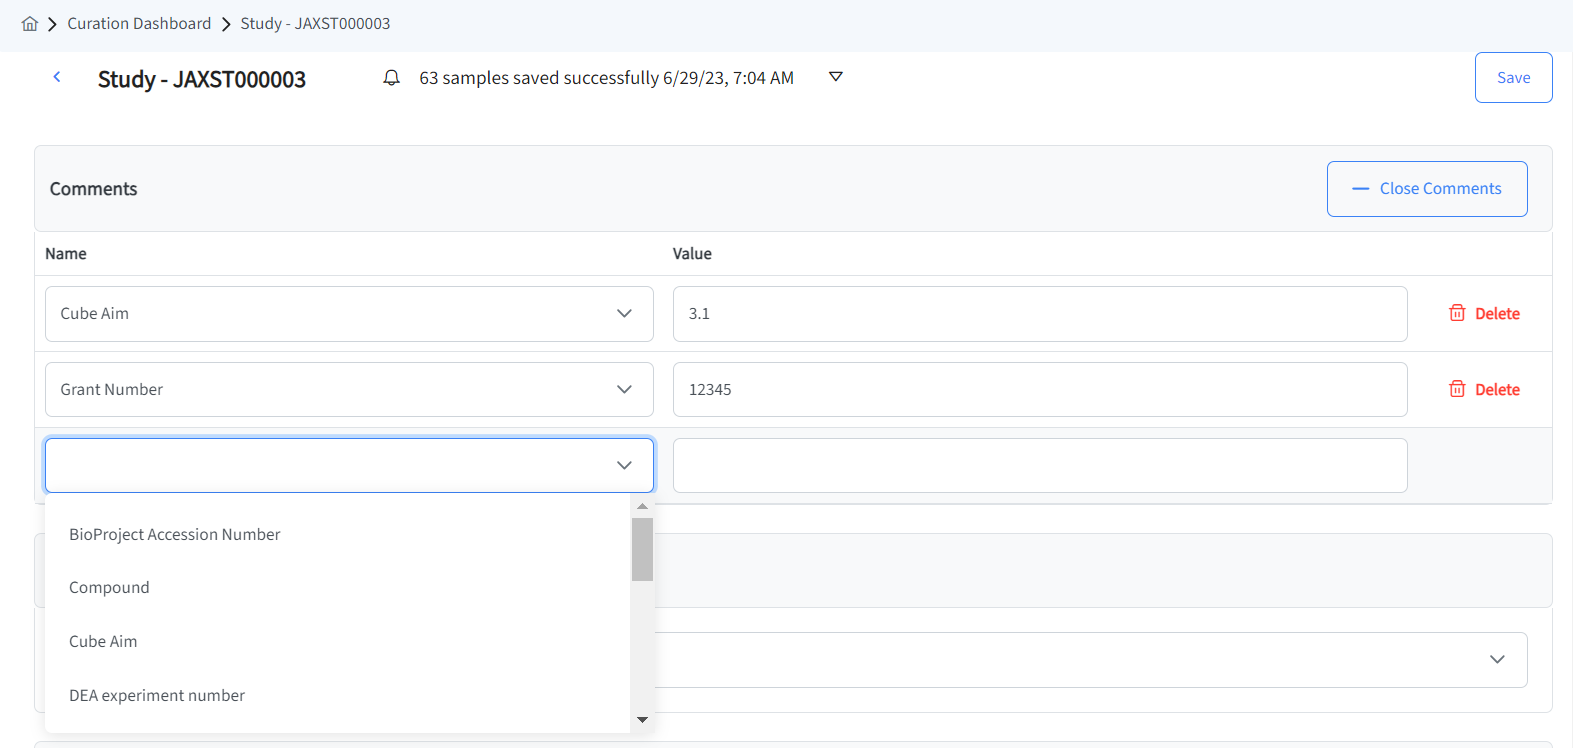
Figure 11: Add study comments for any information not covered elsewhere in the form. A list of common comments are provided to choose from, but custom comments may be entered as well.
13. Assays
Once sources have been entered and saved, you can add assays. Select the + next to Assays. This will open a new side-drawer window. Assays do not have titles; they are given an identifier based on their measurement type.
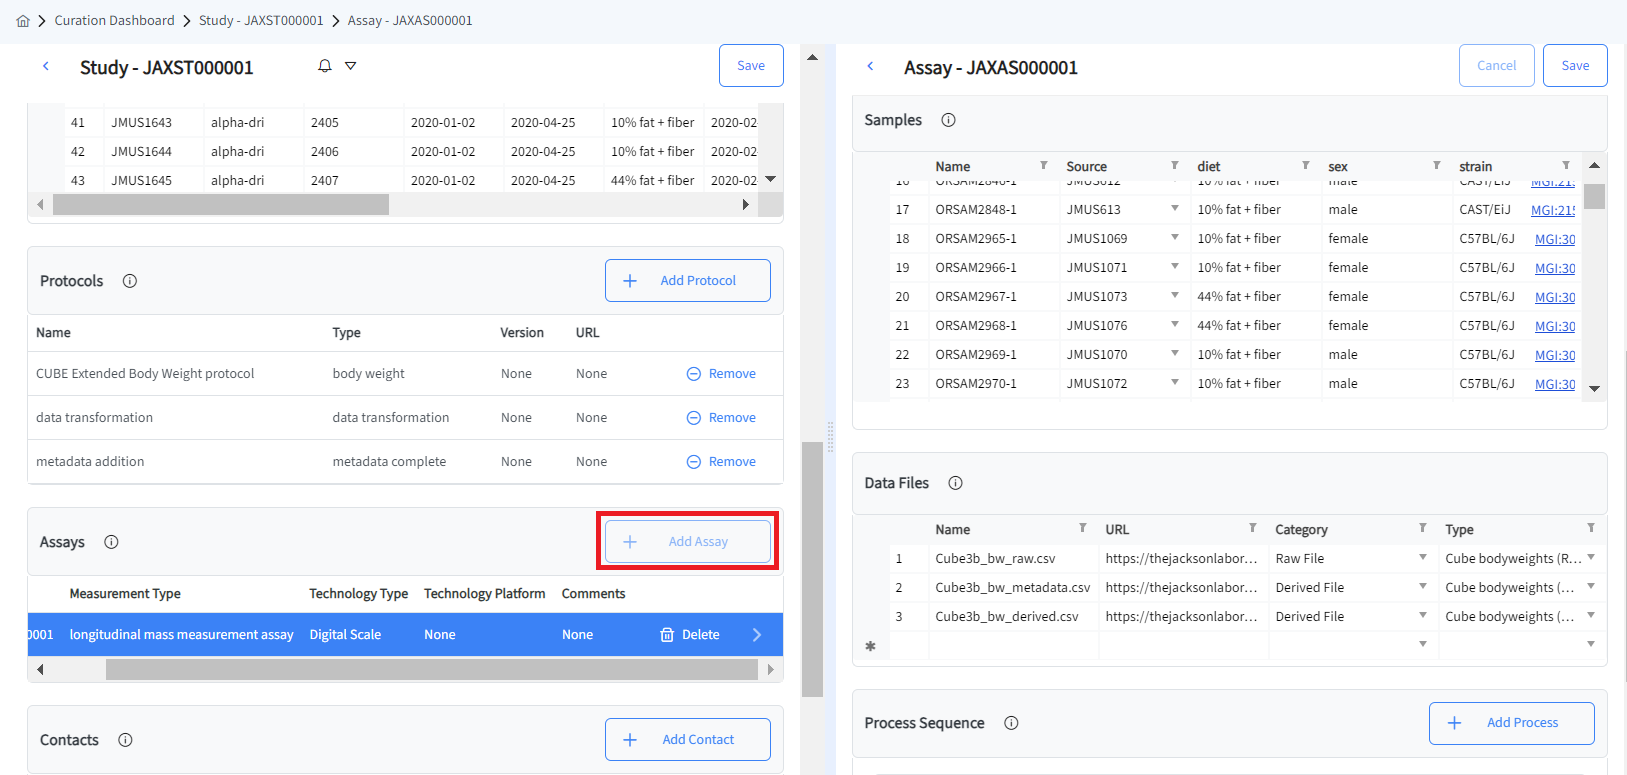
Figure 12: Add one or more assays to your study, this will open in a side drawer on the right side of the screen. You may only add one assay at a time.
14. Add measurement details
In the Measurements section, add the measurement type and technology type from their dropdown menus. Technology platform is a free-form text field. Measurement types and technology types are also controlled terms and can be added by BioConnect curators if needed.
Measurement Type : Select the category describing the nature of the data being measured by the assay.
Technology Type : Select a value that identifies the technology used to execute the assay.
Technology Platform : Enter the specific proprietary format of the assay technology type (e.g., Affymetrix, Illumina.)
Comments: Click the pencil icon to add any comments to the Assay. You may select a controlled term from the list, or enter a custom Name as free text. Curation administrators can add additional Name terms in Admin > Metadata > Administer Controlled Terms > Comments.
15. Upload sample metadata
The sample table contains the factors you listed during the study creation as well as the characteristic categories for your assay. Multiple occurrences of the same assay type will be needed for multiple types of tissue/samples. Characteristic categories are not all used for each assay, but will initially be present. Use the customize columns button to hide the categories not used by this assay.
16. Upload or link data files
Add information about your data files, including the category, i.e., raw data, derived data, or image data. Data files should include a URL to the storage system for access. Data files may be stored in BioConnect or elsewhere, e.g., Box, GitHub, or another research data repository.
17. Describe process sequences
Select + for each process needed, each of the Protocols previously chosen will be available in a drop-down menu in the About section. Assay will not save if you do not choose a protocol after clicking + icon. You have to either delete protocol using the trash icon or add information in it. Add Performer and Date if known, can be left blank. Skip Parameters for now (for all processes). Next, select Inputs, a list of Input Types: Source, Sample, Data, and Material are available. After choosing Input type, select items from drop down list. These are the samples, sources, and data files that you have previously added to the assay. Then, select Outputs, Output type and Output items. Please see Figure 13. Place processes in order performed, processes can be reordered by dragging and dropping as shown in Figure 14.
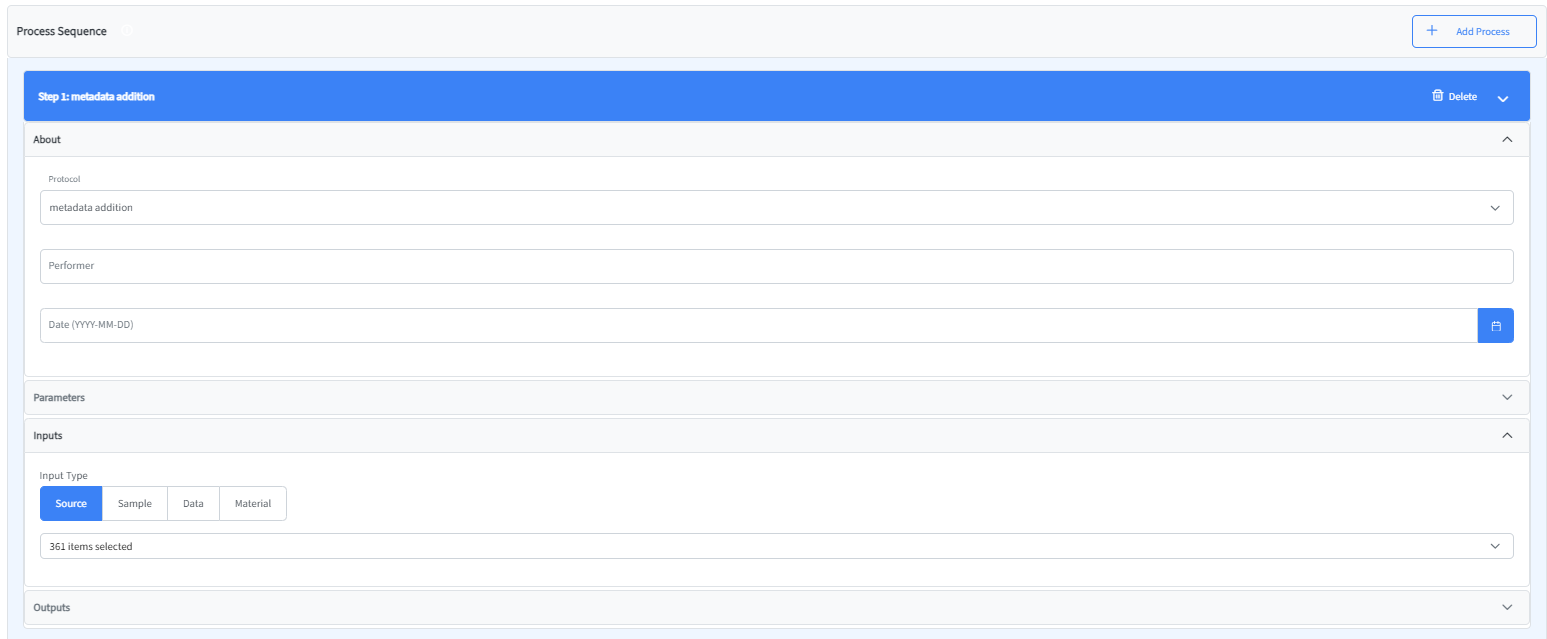
Figure 13: Add details for your process sequence steps, including protocol, inputs, outputs, performer, and parameters.
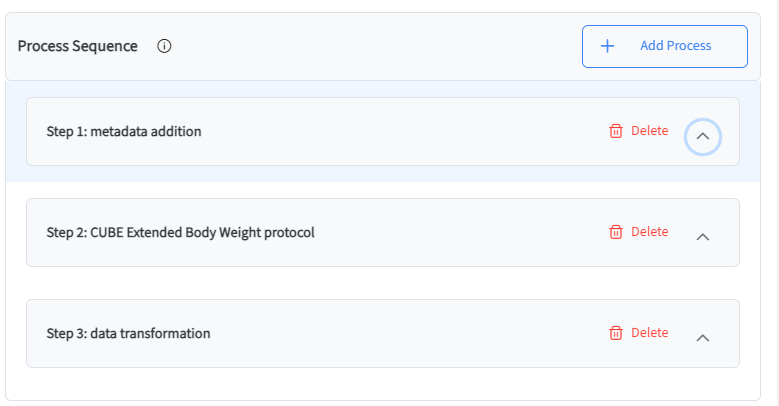
Figure 14: View and manage your process sequence steps. Steps may be dragged up or down to re-order them.